Claude Cowork is a desktop application through which you can choose to grant Anthropic's Claude full access to your files in a dedicated folder (or even more access if you're feeling particularly brave), a persistent memory system, and the ability to run skills across sessions. This guide covers installation and full personalisation so that Claude works for you in the way you want it to.
Why Claude?
Mainly because this is the tool I chose to use and become somewhat familiar with. Feel free to use other platforms — similar principles apply.
Part 1: Installation
1
Create your account and install the app
Go to claude.ai and create a free account using your email address or Google account. Then download the Cowork desktop app for your operating system (Mac or Windows), and install it like any other application.
Note: Claude Cowork is currently in research preview. This means it is fully functional but being actively developed — features may change as Anthropic updates it. The guide on this page reflects the current version.
2
Sign in and choose your working folder
Open the app and sign in with your Claude account. Cowork will ask you to choose a folder on your computer that Claude can access — this is where your project files, documents, and personalisation files will live. Using File Explorer on Windows (or your operating system's equivalent), create a new folder called Claude CoWork or similar. Then go back to the Claude Cowork application and point it towards the folder you have just created.
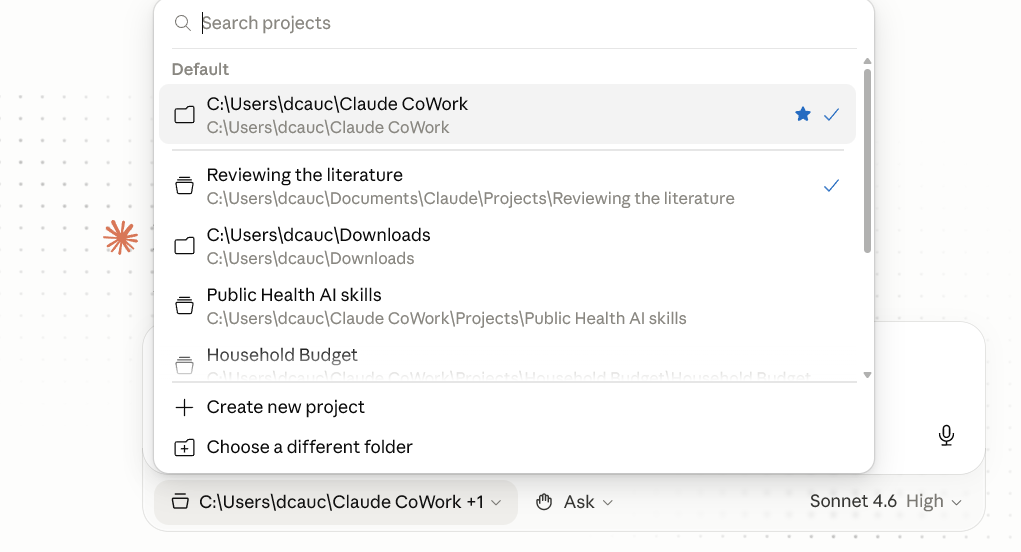
To set your default workspace, click the folder name at the bottom of the Cowork window. A panel appears listing your connected folders. The star next to Claude CoWork marks it as the default — click the star on any folder to make it yours.
Tip: Decide carefully where you want this folder to be, since you will refer to it in your instructions to Claude. Keep it tidy. Everything you want Claude to remember or work with goes here. You can create sub-folders for different projects.
3
Choose your model
Every time you open Claude Cowork afresh, start a new session, or click on 'New Task', you can select which version of Claude to use. There are three options: Haiku is light and fast, suited to simple, basic tasks; Sonnet is the balanced, recommended choice for most work (I used Sonnet 4.6 for everything on this site); Opus is the most powerful, suited to tasks requiring deep reasoning, but noticeably slower and will use up tokens quickly (see Anthropic's choosing a model guide). Once you select a model at the start of a session, you cannot change it until you begin a new session within the same project or open a new one entirely.
4
Tweak Claude's settings
I usually set Claude to 'Ask before acting' to maintain full control over any actions it proposes. I also toggle the 'Thinking' button and choose 'High' or 'Medium' effort, depending on how complex I think the task is. Higher effort uses up tokens faster.
Next, click on your profile icon at the bottom left of the app and select 'Settings'. Modify settings in the 'General' tab as you wish. Instructions for Claude are account-wide settings that help Claude understand your general instructions that Claude should consider in responses: I copied and pasted, then adapted text from my Claude.md file in this box.
In the 'Privacy' tab, toggle 'Help improve our AI models' off.
In the Cowork tab, check that the 'Cowork files — Your artifacts and scheduled tasks are stored at: [...]' points towards the root folder you just created. In this tab you can also add instructions that apply to all Cowork sessions. I've set up my instructions as follows:
#GLOBAL INSTRUCTIONS
At the START OF EVERY SESSION, before doing anything else — including when a
project subfolder is already open — call the `request_cowork_directory` tool to
connect `C:\Users\dcauc\Claude CoWork`. Do this even if another folder is already
connected; the parent folder is needed for the instruction files below and is NOT
visible from inside a subfolder.
Once `C:\Users\dcauc\Claude CoWork` is connected, read these files from it before
starting any task:
* ABOUT ME.md — Who I am: background, research, audience, and voice. Use this to understand context for any task.
* MEMORY.md — Running log of decisions, preferences, and context that carry across sessions. Read this to pick up where we left off. Update it at the end of every session by appending new entries or updating existing ones. This is how you remember what you've been working on.
* WRITING RULES.md — How to write so nothing sounds like it came from an AI. Apply these rules to everything produced in this workspace.
These files are non-negotiable. If they exist in the workspace, read them. No exceptions. If the connection is declined, tell me the reference files could not be loaded and ask whether to proceed without them. Do not silently skip this step.
---
Who I am
....
(Continue with any instructions you think relevant. You may wish to add some from the Claude.md template in the repository)
In the capabilities tab, depending on how much access you'd like to give Claude, you may want to toggle on the 'Allow Network Egress' button. I'm fine with allowing Claude to access the internet so I chose 'All domains' in the Domain allowlist field.
On the other hand I'm more cautious about giving Claude access to its Chrome extension. In the 'Claude in Chrome settings' tab I've blocked Claude's Chrome extension because I don't want Claude taking actions on my behalf through the web browser.
I recommend taking the time to look through the various settings and options — it won't take long and it's worth familiarising yourself with them at the start.
5
Test that it works
Type a simple message in the chat: "Can you tell me what folder you have access to and what files are in it?" Claude should confirm your folder path. If it does, installation is complete.
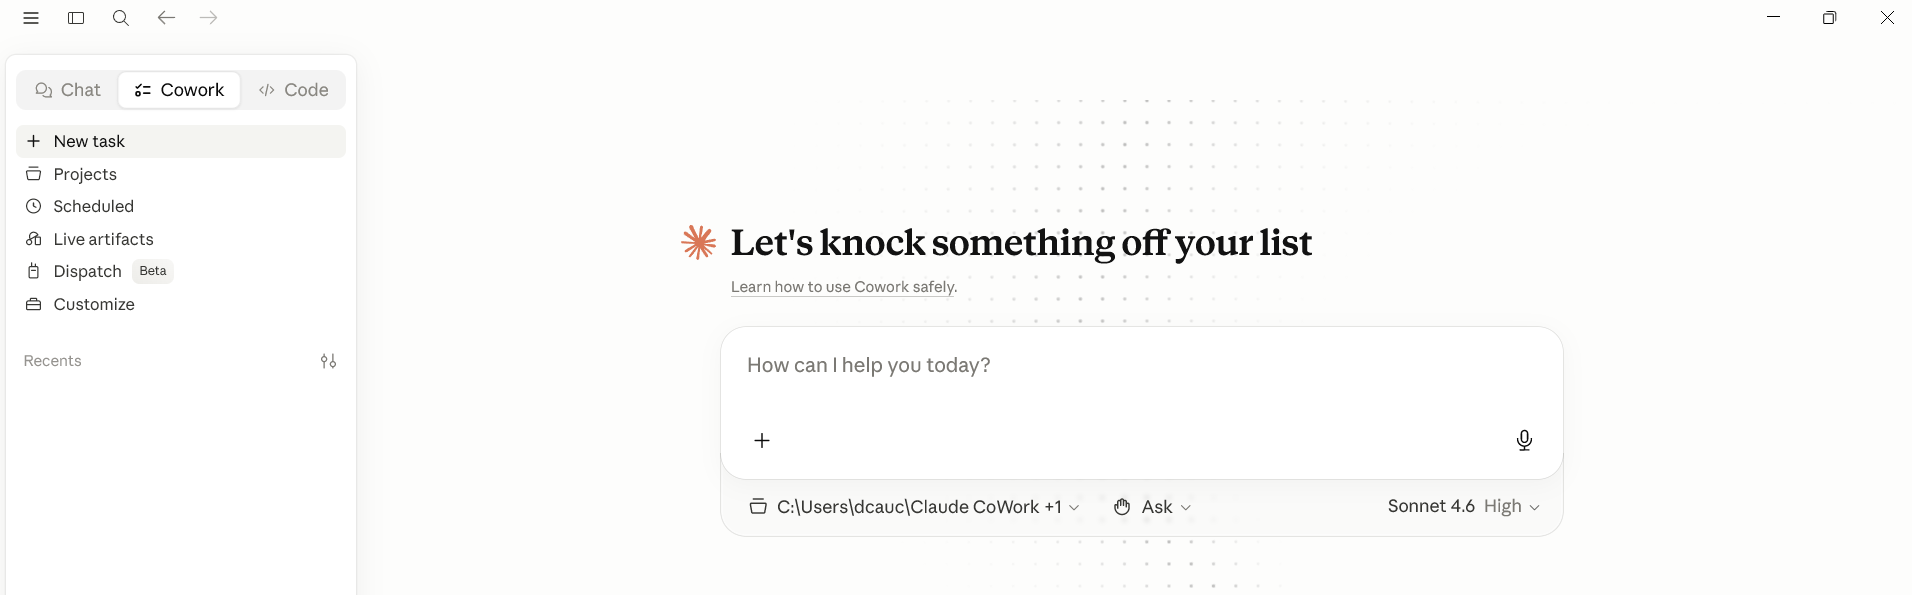
This is what my Cowork setup looks like. The workspace folder appears at the bottom of the screen, confirming it is connected. The sidebar on the left gives access to tasks, projects, scheduled items, and settings.
Part 2: Personalisation
This is what makes Cowork genuinely powerful. By creating four plain-text files in your root CoWork folder, you give Claude a permanent briefing about who you are, how you write, and what you've been working on. It reads these at the start of every session — so you never have to re-explain yourself.
Your four personalisation files
Insert each of these as a plain text file (ending in .md) in your root working folder that you created in Part 1 of this guide. You can write them in any text editor (e.g. Notepad on Windows, TextEdit on Mac) or simply ask Claude to help you write them. You will also find templates in the repository that you can download and edit.
ABOUT ME.md
Tells Claude who you are — your professional role, your setting, your level of experience with AI, the audiences you write for, and the kind of tasks you typically bring to it. The more specific you are, the better Claude tailors its outputs.
WRITING RULES.md
This file tells Claude exactly how I want things to sound: plain, direct, and not like an AI (the irony, I know!). It sets your style preferences — British or American spelling, formal or informal register, sentence length, whether to use bullet points or prose, words and phrases to avoid, and any house style your organisation uses. Claude applies these rules to everything it produces for you.
MEMORY.md
A running log of decisions, context, and information that carry across sessions. Claude updates this automatically after each session — adding what it learned, decisions you made, and work in progress. This is how it picks up where you left off without you having to recap everything.
CLAUDE.md
This sets the standing rules for every session: read the reference files first, never delete anything without asking, never send anything without my permission, use the described workspace structure.
Note: I settled on this setup after some trial and error and after looking at videos and websites by creators that I have credited in the About page. Do have a look at these for more detail if you're interested. It is not the only possible setup, just one that I am comfortable with and have found to be useful. Feel free to copy and amend the Markdown files in the repository page. Also, don't be shy about asking Claude directly for tips and suggestions on the best way to set up your workspace in a way that works for you.
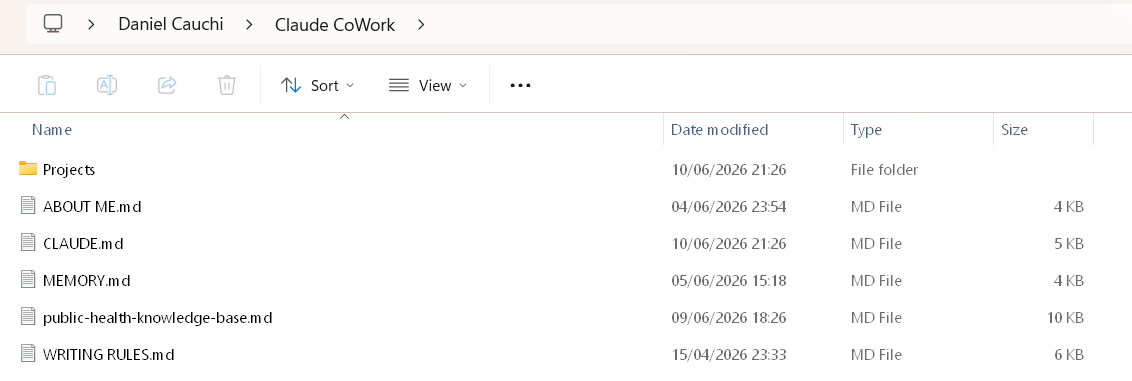
Inside my 'Claude CoWork' root folder.
Inside my 'Claude CoWork' root folder you will also see a folder called 'Projects'. Every time I start a new piece of work, I create a new project for it. That way, it gets its own subfolder within the Projects folder: for example, to create this website I created a project called 'Public Health AI skills'. Each project contains its own memory file tracking progress specific to that project, and an outputs folder where all finished documents are saved. Everything for a project stays together in one place.
You will also notice a file called 'public-health-knowledge-base.md' sitting in my root Claude CoWork folder rather than inside any specific project. This is intentional. The file is linked to the Public Health Skill: a custom skill that guides Claude through structured systems-thinking analysis for public health work. Because that skill is used across multiple projects, its knowledge base lives at the top level rather than being buried inside one project folder. Every time the Public Health Skill is activated, Claude reads this file first to understand what frameworks and approaches have been used in previous sessions, what my preferred tone and output formats are, and what past projects have covered. At the end of each session, Claude updates the file automatically — logging what was done and adding anything new. Over time it builds up into a working record of how I use that skill, which means each session starts with more context than the last.
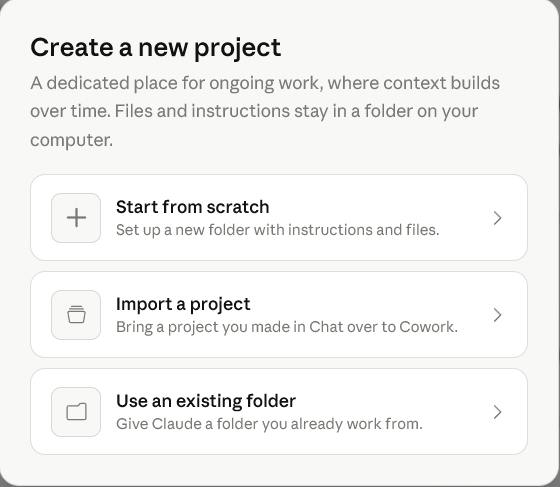
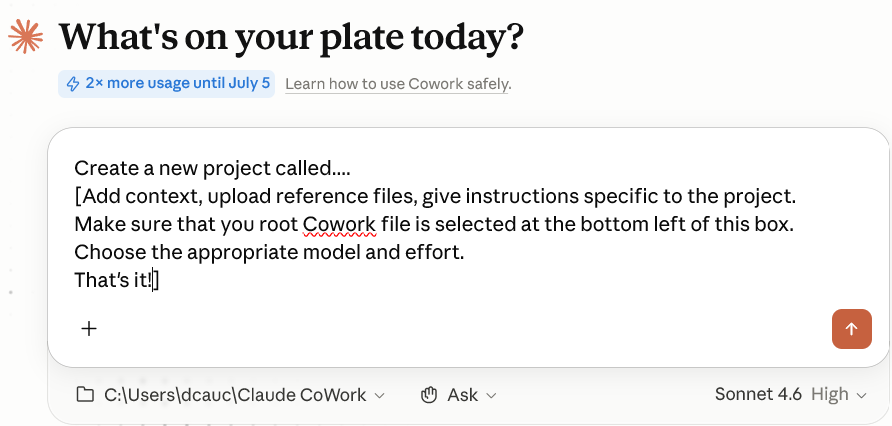
Now, let's create a new project. You can click on 'New Project', which opens up three options to choose from. However, there is a better way.
You do NOT need to choose from these three options if you've set up Claude Cowork as instructed above.
Instead, simply tell Claude that you want to create a new project, and give it some more detail and context. Make sure that you point it towards the root 'Claude CoWork' folder that you created in Step 1 and which the Claude.md file refers to. Claude will first read the Claude.md file, then follow its instructions.
Simply ask Claude to create a new project. Note the root folder where the project will be created at the bottom left of the box.
The first time you do this, you may be asked to confirm that Claude can access the root folder:
Click on 'Allow'.
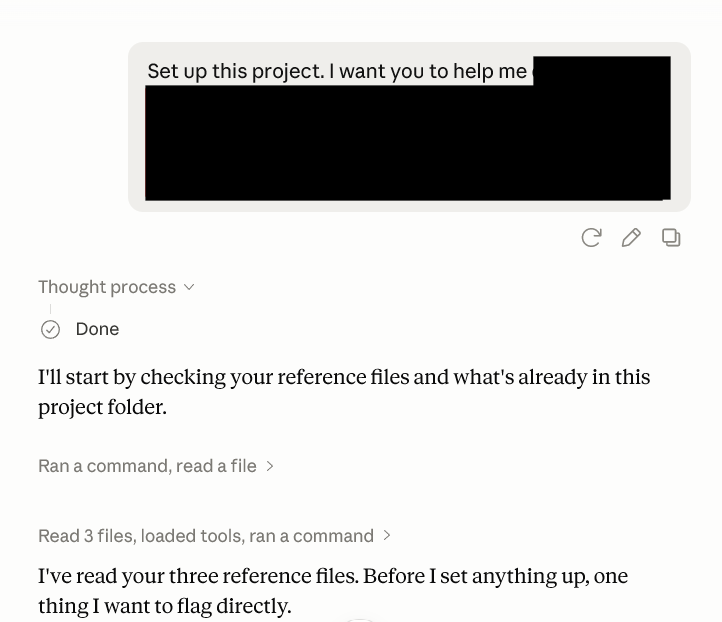
Once you grant access, Claude will follow the instructions in the Claude.md file in the root folder, read the other three markdown files and create a new project with the structure you specified.
Claude follows your instructions...
Part 3: Working effectively with AI
Understanding usage limits
Every AI platform has usage limits — either message caps (free tier), rate limits, or context window constraints. Rather than treating this as a frustration, understand it as a design feature that encourages better practice.
The principle is simple: working within constraints forces you to structure your work more deliberately. Instead of asking an AI to "do everything," you break the task into discrete pieces, provide clear context, and get focused outputs. This usually produces better results than asking for everything at once.
For specific guidance on your chosen platform's limits and how to optimise within them, refer to the platform's official documentation or resources like Claude 101 which cover advanced usage patterns.
Avoiding agreement without pushback
Claude will tend to validate your thinking. It won't push back unless you ask it to. You need to deliberately create space for critical thinking.
In your ABOUT ME.md or WRITING RULES.md, include something like: "When I ask for analysis or advice, challenge my assumptions. Tell me if the framing seems wrong, if I'm missing something obvious, or if the evidence points elsewhere. Don't just agree with me."
This is particularly important in health work where decisions affect real people. You want a thinking partner, not a rubber stamp.
Systems over prompts
There is no point in spending hours perfecting the perfect prompt. The more effective approach is to build good systems and then use simple prompts.
A good system means: clear personalisation files (ABOUT ME.md, WRITING RULES.md, MEMORY.md), organised context (reference documents, frameworks in your working folder), and structured workflows (file naming, folder organisation, consistent question-asking patterns). Once these foundations are in place, your prompts can be short and direct because Claude already understands the context.
Build the system first. The prompts will be better and simpler as a result.
Your first real task
Once you are set up and personalised, try a real task. A good starting point is to paste in a public health skill from the repository and use it on a current project.